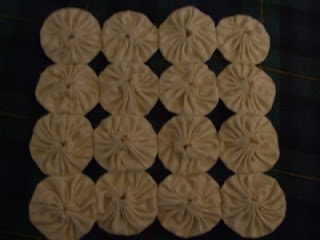
To make a candle mat, simple cut out a circle (size of your choice). You can use any circle object to make a template, a CD, cup, plate, saucer, etc. Trace it on to a piece of cardboard and cut out. Now, they Clover Crafts makes a Yo Yo maker. They have a large and a small size. Personally, I think they aren't necessary. Don't make yo yo making any easier, the only good thing is you will have perfectly uniformed stitches, which is not that important to me, but might be to you.
After you cut out your template, lay it on the wrong side your fabric and trace, trace, trace. cut, cut, cut. The number of yo yo's you will need will depend on how big you want your finished mat and how big your circles are. The mat in the picture was made with circles approximately, 4 1/4 inches, the finished yo yo turned out to be about 1 3/4 inches. I sewed four rows across and four rows down. My finished mat was about a 7 1/4 inch square. Experiment.
Once you have all your circles cut out, thread your needle and sew a running stitch around your circle. As you sew, turn the edge of your circle under about 1/4 of an inch so you have a smooth clean edge. If you don't know how, check out this video on how to make a running stitch. A little tip: Shorter or little stitches create a more open center, longer, wider stitches make a tighter, more closed off center when you are done. I chose black thread so it would show up better against the white fabric, but you will want to pick a thread that will match. Once you've sewn all around your circle, pull your thread slowly and firmly. This will gather your fabric. Pull as far as it will go, and knot off your thread. Fix your gathers, and flatten your yo yo.
Now, to put it all together is just as simple. Take two yo yo, hold them together, front to front ( your two centers will be belly to belly so to speak). On the side of your two pressed together yo yo's, sew them together with a whip stitch. You don't want to sew too much. You basically want them tacked, about 1/4 of an inch. If you don't know how to whip stitch, check out this video. Repeat this step till you have the length you want. Personally, I sew two yo yos at a time, then when I several sets, I sew two, to two others ( like sewing a couple to a couple), til I get the length I want. And once you do...well, you're done. They really aren't just for candles, use them in place of doilies under lamps, candy dishes, vases, pictures, anything you want really.
For yo yo craft #2...also very simple...make a yo yo sachet. These make cute gifts for friends, co workers, teachers and such. Hang them from door knobs, dressers drawers, closets or throw some in your draws and cabinets.
Cut out a big circle and a smaller. I used a dinner plate and a saucer as a template. Using the steps above, make a yo yo. The exception is, before close off your yo yo, add some potpourri into the center of your circle. You could also use herbs, such as lavender. You don't want to make it too full, so experiment with the puffiness of it before you tie it off. Once you got it where you want it, finish off your yo yo like I explained above. Make your second, smaller yo yo the same way, minus the potpourri. You are going to make this yo yo just like you did for the candle mat. Once you got it done, glue the smaller yo yo over the center hole of your larger one. This is going to keep your potpourri from falling out. You can leave it just like that or cover your center hole of your smaller yo yo with a button, flower, bow, whatever. Thread a needle with a bit of thread or floss and near the top of your bigger yo yo, just sew a hanger loop. Once again, you're done! How simple are these things to make!!??
Now, totally random here...I made some freebies that I was suppose to post back before Christmas...yeah, yeah I know. But I'm sharing them now...that has to count for something...right??? Just right click and save to your computer :) I hope you enjoyed this post and stop back again. Happy Crafting!


No comments:
Post a Comment